
As of 2025, Google Blogger continues to be a popular platform for creating websites and blogs. While exact, up-to-date visitor statistics for Blogger-hosted sites are not publicly disclosed by Google, it’s estimated that tens of millions of people visit Blogger websites monthly.
In April 2023, for example, around 78 million people visited websites built on Google Blogger, as mentioned in earlier reports. Given the platform’s consistent use and improvements, it’s likely that the number of visitors in 2024 remains in a similar range or has grown slightly.
For precise traffic data, you can use tools like Google Analytics or SimilarWeb to track visits to specific Blogger websites
Do you want to earn money from Blogger? If yes, then it is very important for you to know what Google Blogger is.
The most exciting part about Google Blogger is that you can set up your blog for free and potentially earn lakhs of rupees through blogging. Blogger is a platform where you can create your own blog or website and share your thoughts, ideas, and expertise with readers. To get started, you can even use our free AI-based blog idea generator tool to discover the latest and trending topics for your blog.
Now, you might be wondering how this works. The key is to leverage your skills and knowledge to create content that resonates with your audience. For example:
- If you’re passionate about cooking, you can start a cooking blog and share recipes, tips, and culinary techniques.
- If you’re an expert in digital marketing, you can create a blog focused on marketing strategies, tools, and trends.
For new bloggers, Blogger is an excellent platform to learn the basics of blogging while earning money. It’s user-friendly, free, and a great way to build your online presence.
That’s why, in today’s article, I’ll explain what Blogger is and how to create your own blog. This guide will be incredibly useful for beginners, so make sure to read carefully and understand each step.
Let’s get started what Google Blogger is.
What is Blogger
Google Blogger is a completely free service for new bloggers, as it is a product of Google. This means you don’t need to spend any money to create your blog on Blogger. The platform offers free domain and hosting, making it an ideal choice for beginners.
Many new bloggers are unaware of what Google Blogger is. For those unfamiliar, Google Blogger is one of the simplest and most accessible ways to develop your blogging skills. It’s also commonly known as Blogspot, and it provides all the essential tools you need to start sharing your ideas with the world.
Google provides free HTTPS solutions, which is excellent for bloggers and makes Blogger secure. After creating content on Blogger, bloggers must carry out many kinds of SEO, such as technical, off-page, and on-page SEO.
By offering a theme choice, Blogger enables bloggers to add visual appeal to their material. We’ll go over each of its features in more depth soon. You must also be mindful of Keyword SEO in Blogger.
This platform is a superb choice for you if you are a skilled writer with a lot of wonderful thoughts to share. Here, you may produce stuff, distribute it, and get paid for it.
What is a Blog?
A blog is a type of website or online platform where individuals, groups, or organizations share information, ideas, opinions, or experiences in the form of written articles, images, videos, or other multimedia content. The term “blog” is short for weblog, which originally referred to online journals or diaries. Over time, blogs have evolved into powerful tools for communication, education, and even business.
How To Become a Successful Blogger
The idea of Google Blogger is familiar to seasoned bloggers, but new bloggers may still be unsure about what Google Blogger is and how to sign up for it. Did you know that every month, some 100,000 people try to start their own blogs, but only a small percentage—perhaps as few as 10 or 50—are successful? If yes, then I’ll provide you with some tips on how to become a successful blogger. Let’s understand what those tips are:
- Choose a Niche: Pick a topic you’re passionate about and that has an audience.
- To become a blogger, you need to first identify your skills and strengths in a particular field
- Select a Platform: Use platforms like Google Blogger, WordPress, or Wix.
- To make sure that your blog entries can rank highly on Google, pay careful attention to the quality of your material, particularly if you’re a rookie blogger.
- Blogger allows you to kickstart your online career, making it a great platform for beginners.
- Focus on On-Page, Off-Page, and Technical SEO for your blog posts to grab Google’s attention.
- Create Content: Write high-quality, engaging posts that provide value to your readers.
- Promote Your Blog: Share your posts on social media, forums, and through email newsletters.
- Engage with Readers: Respond to comments and build a loyal community.
Step By Step Guide to Create Free Blog in Blogger
The process of starting a blog on Blogger is actually very simple and not as complicated as it might appear. Understanding what Google Blogger is is a prerequisite for learning how to start a blog on the platform. Now that you understand what Google Blogger is, you can follow my steps below to learn how to start a professional blog. “How to create a blog on Blogger, step by step” brings us to our first topic.
#First Step: How to Create a Blog
To create a blog, the first step is to create a Gmail account. Visit www.google.com and sign up for a Gmail account if you don’t already have one. Once your account is set up, look for the Google Apps icon (a grid of small squares) on the top-right corner of the page. Click on it, scroll down, and you’ll find the Blogger app. Click on it to get started with creating your blog.Alternatively, you can directly visit the Blogger website by going to www.blogger.com. This will take you straight to the platform where you can sign in with your Google account and start creating your blog.Next, you’ll see the option “Create your blog”—click on it to begin setting up your blog. If you prefer, you can also search for “Blogger.com” on Google to directly access the Blogger homepage and start the process from there.

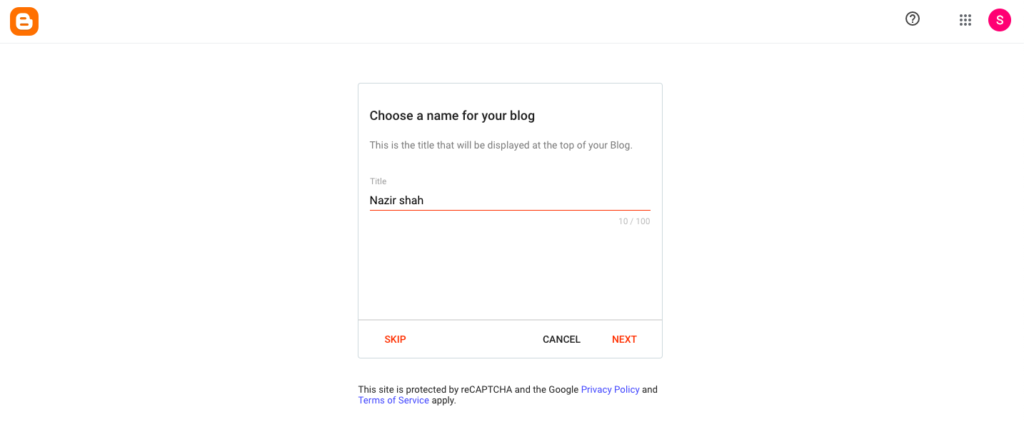
You must first register with your email address after selecting the “Create Your Blog” button. You will then be taken to the Blogger page for creating a new blog, where you must complete three required fields. Let’s examine what those three essential features are.
Blog Title
You must first choose a title for your website. As the face of your website, your title makes it easier for readers to understand the subject of your blog.
Blog URL
After finalizing your website title, the next step is to create a URL for your site. Keep in mind that your first choice of URL might not be available, so you may need to try alternative options until you find one that works. Be creative and flexible while selecting a URL that aligns with your blog’s theme and title.
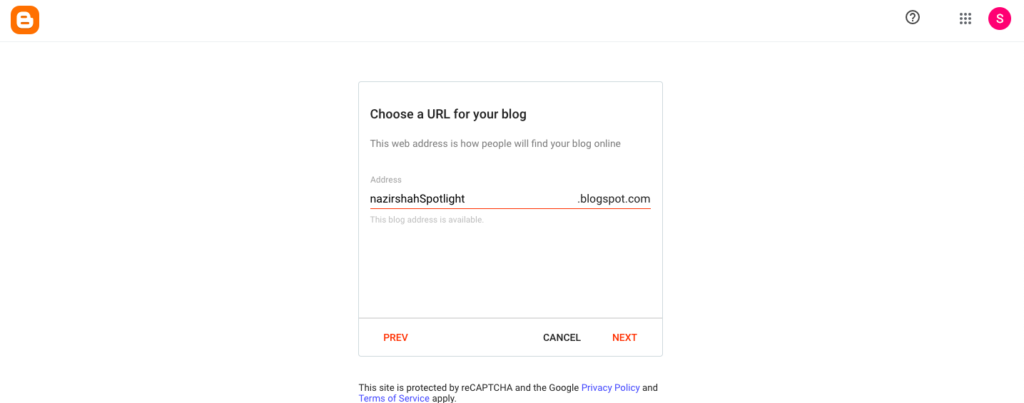
Keep trying different URL options until you find one that’s available and confirmed. Once you’ve successfully secured your desired URL, you can save it and proceed with setting up your blog.
#Step 2: Required Configurations
After signing up for Blogger, the next step is to update your website’s settings. To do this, navigate to the left side of the Blogger dashboard and click on the “Settings” option. This will allow you to customize and configure your blog according to your preferences.
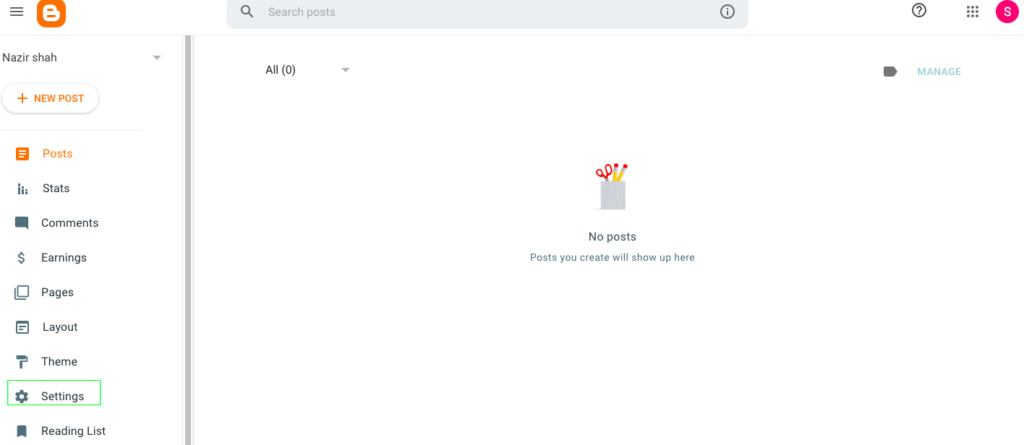
Once you click on “Settings,” you’ll find a range of options—some essential, some important, and others less critical. We’ll walk you through updating each of them step by step. Are you ready to learn? Let’s dive in and get started! 😊
Basic Settings
As the name implies, these are basic settings, but they are absolutely essential. If you don’t configure them correctly, your blog posts may struggle to rank on Google. Properly setting up these basics is the foundation for your blog’s success.
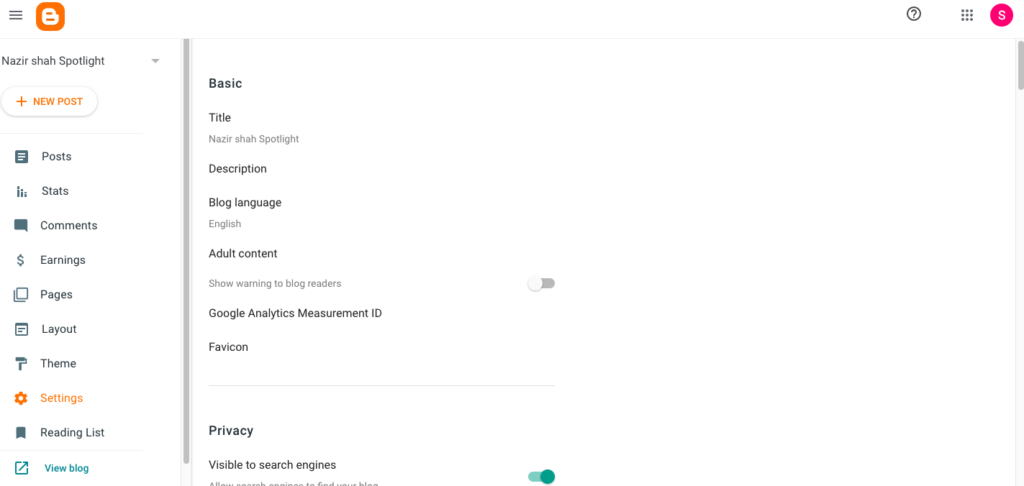
In the basic settings, the first thing you’ll see is your website title, which you can edit if needed. Below that, you’ll find the website description—a critical element for helping Google understand and rank your site. Make sure to write a 500-word SEO-friendly description that aligns with your website’s niche.
Next, you can set the language based on the content of your website. If your site includes adult content, you can enable the “Adult Content” option. This will display a warning to visitors, letting them know that your website contains adult material.
If you want to track your website’s performance, you can submit your Google Analytics Property ID. This will give you detailed insights into your website’s traffic, user behavior, and overall performance.
The final setting is for the Favicon, which is the small icon that appears in the browser tab next to your website’s name. You can upload a custom favicon for your site, but make sure the image is less than 100 KB in size and square in shape for optimal display.
Privacy
Do you want Google to ignore your blog? Of course not! To ensure your blog gets ranked, check your Blogger privacy settings. If the “Visible to Search Engines” option is disabled, make sure to enable it. This allows search engines like Google to crawl and index your blog, helping it rank in search results.

Exactly! If you don’t enable the “Visible to Search Engines” option, no matter how high-quality your article is, it won’t rank on Google. This is because you haven’t allowed Google to crawl and index your blog post. Make sure this setting is turned on to give your content the best chance of being discovered.
Publishing
After adjusting the privacy settings, you’ll move on to the publishing settings. Here, you’ll first see the URL for your blog post, which you can modify if needed. Below that, there’s an option for a custom domain. If you already own a domain, you can connect it to your blog for a more professional look.
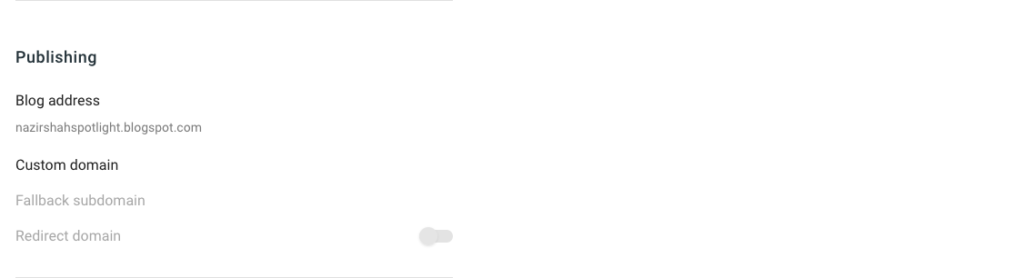
If you don’t already own a domain, you can purchase one through Google starting at just 3000 Pak Rupees. This allows you to create a custom domain for your blog, giving it a more professional and personalized touch.
HTTPS
Would you prefer to visit a website that’s not secure, potentially exposing your information to hackers? Of course not! That’s why it’s crucial to enable the HTTPS option for your website. This ensures your site is secure, and visitors won’t see an “insecure” warning when browsing your blog.

Once you’ve enabled HTTPS, you’ll notice a padlock icon appearing before your website’s URL in the browser. This padlock is a clear indicator that your website is secure and safe for visitors to browse.
Permissions
Now, let’s discuss permissions. In this section, you’ll first need to designate the blog’s author. If you’ve just created a new blog, you are automatically the author and owner by default. However, if you’d like someone else to contribute blog posts to your website, you can invite them as an author. Once added, their name and information will be displayed alongside the posts they create.
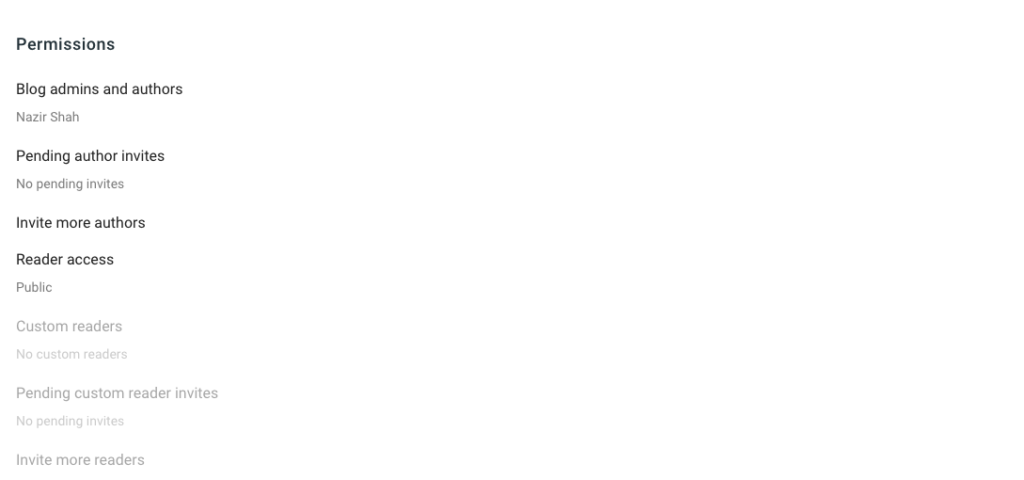
Do you want to create a website that’s accessible only to selected individuals? You can make this happen using the “Reader Access” option. While this approach can work well for exclusive content, keep in mind that most ventures thrive when they have a large audience. With a bigger audience, you can also explore revenue opportunities through paid access or subscriptions.
Post
Within this option, you can set the number of posts displayed on your Home Page. By default, it’s usually set to 7 posts, but you can adjust this number based on your preference. However, I’ve noticed some websites displaying 20 or 25 posts on their Home Page, which can slow down the site and negatively impact the user experience. To maintain optimal performance, it’s recommended to limit the number of posts on your Home Page to around 15 or fewer.
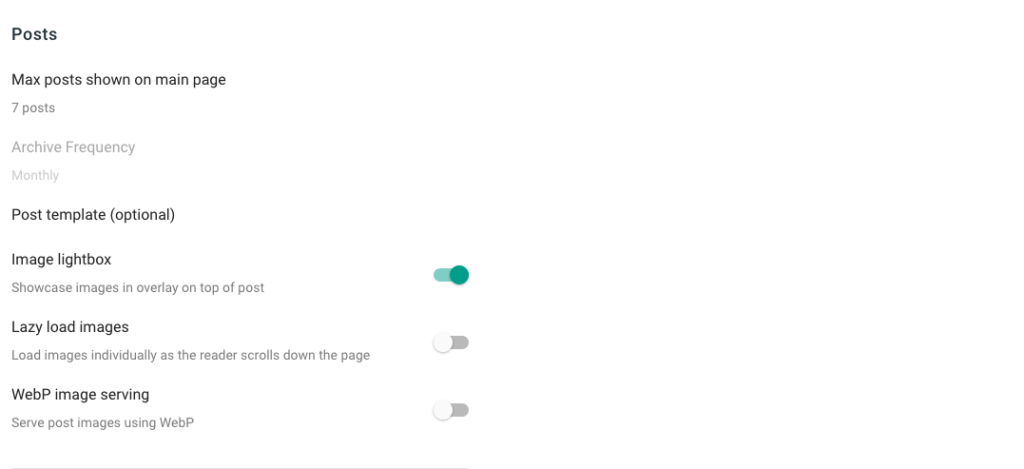
You can customize your blog posts to better suit your website’s style and purpose. For instance, with the “Image Lightbox” feature, you can display your blog posts in an eye-catching overlay at the top of your homepage. Additionally, the “Ideas Panel” can help by suggesting relevant questions and topics related to your blog posts, which you can showcase on your homepage to engage your audience.
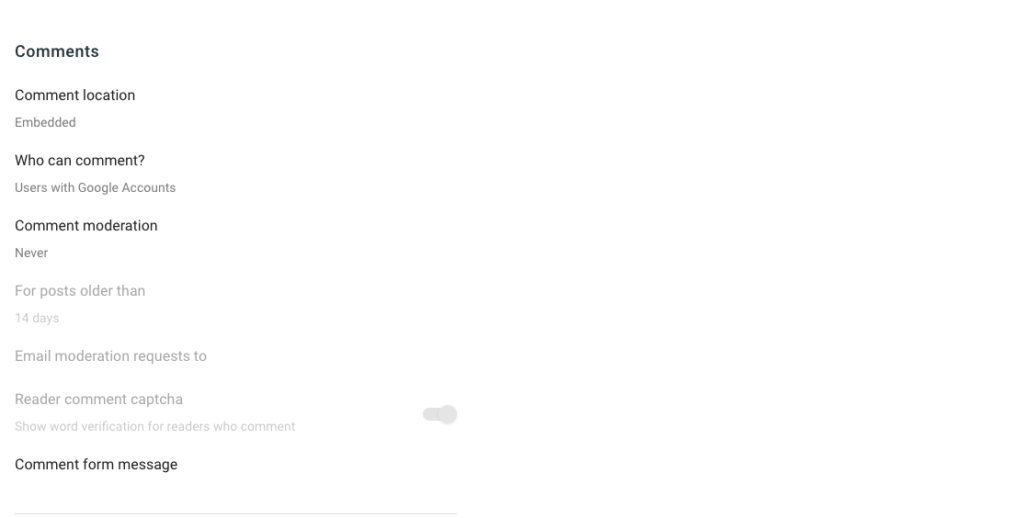
Comments
The comment section is a vital part of any blog or website, as it fosters interaction between readers and content creators. Comments not only help Google assess the engagement and value of your blog posts but also provide you with insights into your audience’s thoughts, which can positively impact your rankings.
In Blogger, you can customize the comment settings to control how readers engage with your posts. For example, you can decide whether readers need to include their location when commenting. These settings allow you to effectively manage and moderate the comment section.
To keep your comment section spam-free and well-organized, consider the following options in Blogger:
- Comment Moderation: You can choose to moderate comments before they are published on your blog. This ensures that you review and approve comments before they become visible to other readers.
- Comment Location: You can decide whether readers need to include their location when commenting. Enabling this option can add context to comments and foster better discussions.
- Member-Only Comments: You can restrict commenting to members of your website only. This means that only registered users or members can leave comments, which can help in building a community.
- Notification for Replies: Enable notifications for comment replies. This allows readers who leave comments to receive notifications when someone responds to their comments, encouraging engagement.
- Captcha: To prevent spam comments from bots, you can enable Captcha verification. This helps ensure that real users are leaving comments and not automated scripts.
The “Post Using Email” feature in Blogger enables you to publish or save drafts of new posts by simply sending an email to a unique email address provided by Blogger for your blog. This feature is incredibly convenient for bloggers who prefer writing content via email or want a quick way to publish or save drafts without needing to log into their Blogger account.
To use this feature:
- Enable Post Using Email: In your Blogger dashboard, go to Settings > Email. Here, you can enable the option to post using email.
- Set Up Email Address: Blogger will provide you with a unique email address associated with your blog. You can send an email to this address with your blog post content.
- Specify Settings: You can customize settings for emailed posts, such as whether they should be published immediately or saved as drafts. You can also specify labels, publish date, and more in the email subject or body.
- Send Email: Write your blog post content in the email, and when you’re ready, send it to the provided email address.
- Publish or Draft: Depending on your settings, Blogger will either publish the email as a new post or save it as a draft.
This feature is ideal for bloggers who want the flexibility to create and manage posts without having to log into their Blogger account every time. It streamlines the content creation process, making it especially handy when you’re on the go or prefer using email for writing.
However, it’s important to keep your unique email address secure, as anyone with access to it could potentially publish or draft posts on your blog. Always ensure this information is protected to maintain control over your content.

In addition to this feature, you will find various other features in the Email section, such as pending post and comment notification email settings, and the ability to invite people for post notifications. You can configure these settings according to your preferences.”
Formatting
Now, let’s discuss formatting, starting with setting your targeted country’s time zone. For instance, if you’re writing in Hindi or your audience is primarily in Pakistan, you should select the PK time zone. While some bloggers think this doesn’t matter much, I disagree—time zone formatting is essential for both reader psychology and SEO. It ensures your posts are timestamped correctly, aligning with your audience’s local time and improving engagement.
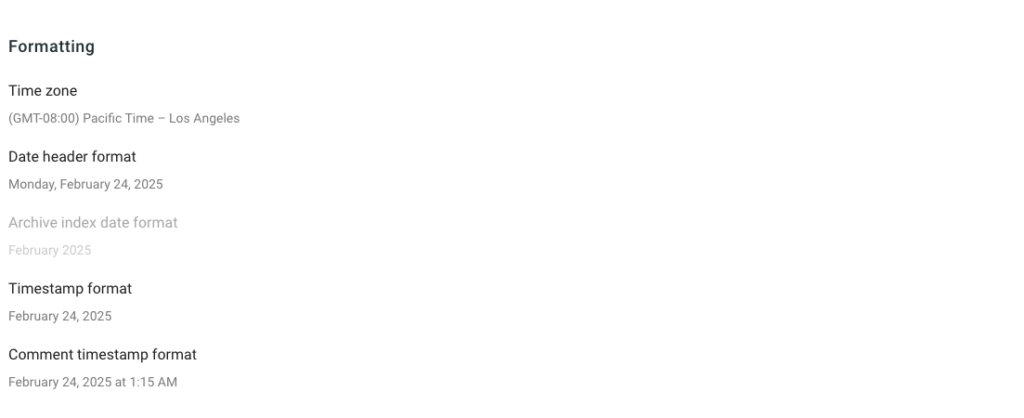
Next is the date header format, where you can choose any option according to your preference. After that, you can set the timestamp and comment timestamp format as per your liking, as these don’t hold much significance.
Meta Tags
As you might already know, meta tags play a vital role for your website because they help search engines understand the topic and content of your website or blog post. That’s why enabling this option in your Blogger settings is extremely important for improving your site’s visibility and SEO performance.

Not only that, but after enabling meta tags, you’ll also find an option below called “Search Description.” Here, you need to write an SEO-friendly description that clearly represents the topic of your blog. This description helps search engines better understand your website’s content, which can significantly improve your search engine ranking.
Errors And Redirects
In this setting in Blogger, you can solve some important technical issues related to your website. Firstly, there are options for custom 400 pages and custom redirects. Sometimes, even big bloggers face technical difficulties on certain pages, and they have to set those pages to ‘404 not found’ manually. That’s why Blogger provides you with this option, so you can easily set up a custom 404 page not found for your Blogger website
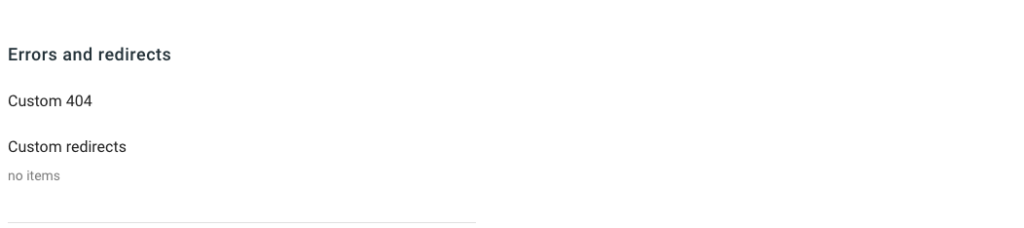
The second feature is Custom Redirect, which is a tool that almost every blogger will need at some point. This option is particularly useful when you want to redirect visitors from one page of your Blogger website to another, ensuring a seamless user experience.
Crawling & Indexing
Crawling and indexing are fundamental to any website’s success, as they allow search engines to analyze and rank the site’s content. Bloggers also have access to these features, which enable them to optimize their website for better visibility and ranking on Google and other search engines.
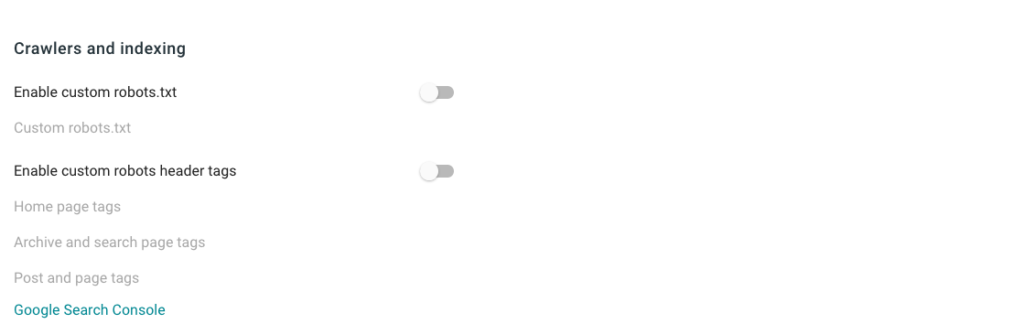
Secondly, within Blogger’s settings, you can set tags for different types of pages, such as the home page, search pages, and post pages. This helps search engines analyze your website more effectively. You can also create custom tags for each page type. Additionally, Blogger allows you to add a custom robots.txt file for your website, which can further enhance your site’s ranking potential.You need to turn on the monetization once your site is ready with some articles.
#Step 3: Pick an Excellent Blogger Theme
In Blogger, you can install and apply a theme to give your blog an attractive and professional look. Blogger offers a variety of built-in themes, but if none of them meet your needs, you can also download free or paid themes from the internet. Once downloaded, you can easily apply the theme to your blog.
If you want to tweak the theme, Blogger allows you to customize it to match your preferences. The platform provides a live preview feature, so you can see how your changes will look in real-time, making the customization process simple and intuitive.
When selecting and applying a theme, it’s crucial to ensure it’s mobile-friendly. Since most visitors access websites through mobile devices, a mobile-friendly theme guarantees that your audience can read your blog seamlessly, without any issues, on their smartphones or tablets.
#Step 4. How to change the Blogger Layout
Once you’ve installed a theme in Blogger, the next step is to customize the layout. Let me walk you through how to use the Blogger Layout feature effectively.
You’ll find the Layout option just above the theme settings. By clicking on it, you can access all the layout customization tools and adjust your blog’s structure to match your preferences. These options allow you to make your blog more visually appealing and user-friendly.
Customizing your layout can help you better align your blog with your visitors’ needs and the type of content you publish. When your blog is visually engaging and easy to navigate, it can boost traffic and improve your blog’s search engine ranking.
Here are some key points to keep in mind when modifying your layout:
- Header: You can customize the header of your blog, including the title and description. You can also add a logo or image.
- Navbar: You can choose to display or hide the navigation bar, and you can customize its appearance and location.
- Sidebar: You can add gadgets and widgets to your blog’s sidebar. This is a great place to include popular posts, labels, advertisements, or other relevant content.
- Blog Posts: You can configure how your blog posts are displayed, including the number of posts per page, post snippets, and the way posts are sorted.
- Footer: You can customize the footer area of your blog, which often includes copyright information, links, and other widgets.
- Add a Gadget: You can add various gadgets like HTML/JavaScript, popular posts, recent posts, and more to enhance your blog’s functionality.
- Template Designer: Blogger provides a Template Designer that allows you to customize the colors, fonts, and background of your blog.
By carefully adjusting your blog’s layout, you can create a more engaging and visually appealing experience for your readers. This can ultimately lead to increased traffic and improved search engine rankings.
When working on your layout, it’s important to pay close attention to these key points. Additionally, Blogger offers a variety of other layout customization options that you can tailor to your needs, helping you create high-quality content and enhance your blog’s overall appeal.
#Step 5. Important Pages Required for Adsense Approval
Certain essential pages are a must for all websites. Including these pages is crucial because they help both users and Google better understand your website, while also providing several benefits.
Let me walk you through these important pages:
About us Page
Approximately 99% of websites on the internet include an About page. You can add this page to your site under titles like “About Us,” “About Me,” or any other name that fits your niche.
For example, if you’re creating a website in your specific niche, your About page should highlight your skills, expertise, and the purpose of your site. This page helps visitors understand who you are, what you do, and why they should trust your content. It’s a great way to connect with your audience and provide them with valuable information about your website’s mission and goals.
Contact Page
A Contact Page is a vital part of your website that allows readers, business partners, advertisers, and others to easily get in touch with you.
Including this page on your site is essential because it eliminates the need for people to search for ways to contact you. Make sure to add links to your social media platforms (like Facebook, Instagram, and Pinterest) as well as your email address (e.g., Gmail) on this page. This ensures that visitors can reach out to you quickly and conveniently.
Privacy Policy Page
The Privacy Policy page assures visitors that their information is kept private and secure. You can create your own customized Privacy Policy page using our free Privacy Policy Generator tool.
Go to ChatGPT and log in. Then, write a prompt like: “Please create a Privacy Policy page for my [Your Niche] website.” ChatGPT will generate a customized Privacy Policy page tailored to your niche.
Disclaimer Page.
A Disclaimer Page is also crucial for AdSense website approval and overall legal compliance. This page informs visitors about the limitations of your liability, clarifies the purpose of your content, and discloses any affiliate links or sponsored content. Including a well-crafted Disclaimer Page not only helps you meet Google AdSense requirements but also builds trust with your audience by being transparent about your website’s intentions and affiliations.
You can use free tools like TermsFeed or Privacy Policy Generator to create a professional Disclaimer Page tailored to your website. Let me know if you need further assistance! 😊
Go to ChatGPT and log in. Then, write a prompt like: “Please create a Disclaimer Page for my [Your Niche] website.” ChatGPT will generate a customized Disclaimer Page tailored to your niche.
Step 6: How to Write a Blog Post
If you want visitors to read and engage with your blog posts, it’s essential to evaluate your writing skills and your ability to satisfy your audience.
Choose a blog post topic that you’re passionate about or have expertise in, so you can write about it in a compelling and expressive way. Incorporate relevant keywords naturally into your content, ensuring they flow seamlessly without feeling forced. Your post should come across as innovative and valuable to your readers.
To excel as a blogger, you need to stay active and consistent, continually honing your writing skills and adapting to your audience’s preferences.
Being a successful blogger requires discipline. You can lose ground in the competitive field if you don’t update on your blog on a regular basis.
Although anyone may create a blog and produce posts, it takes effort to become a successful blogger. In the beginning, new bloggers in particular should concentrate on creating a large number of posts.
Keep yourself informed and conduct regular research since people will find your blog posts more amazing the more you do.
Long blog entries can occasionally dull readers. Use lists, queries, recommendations, and any other components that add interest to your content without being overbearing to keep them interested.
Step 7: Connect your AdSense account to Blogger
If you have strong writing skills and want to earn money online by creating a blog, the answer is yes—you can monetize your blog by linking it to Google AdSense.
Once you’ve set up your Google Blogger account and understand how it works, the next step is to connect your blog to AdSense. Let me guide you through the process of linking your blog to AdSense.
To do this, you’ll need to follow these key steps:
- First, you need to open Blogger. In this, you will find the “Earnings” option; click on it.
- After clicking on “Earnings,” you will see the option to “Sign up for AdSense.” If you are new, you will see this option 30 days later.
- Click on “Sign up for AdSense.” After that, you will have the option to sign in with Gmail.
- After signing in to Gmail, if you haven’t created an account on AdSense before, you will see the option to sign up for AdSense here.
- After signing up for AdSense, the first thing you will see is your name, Gmail ID, and the URL of your website. Since you are using Blogger to access AdSense, these details are automatically added.
- After this, there is an option for “Get more out of AdSense,” where you are asked if you want any emails related to help and performance. You can select “Yes” or “No.”
- Then, there is an option to select the country.
Next, you’ll see an option for Google’s Terms & Conditions. Carefully read through them, then agree and click on “Create Account.”
Once this process is complete, your AdSense account will be created and ready to use.
After setting up your AdSense account, you’ll need to provide payment address details and submit them. Once submitted, your AdSense account will be linked to your Blogger account. Both your blog and AdSense account will then undergo a review process. If any issues arise, you’ll be notified via email. After addressing the problems, you can reapply. If everything meets the requirements, your AdSense approval will be granted.
Difference between blogger and wordpress.
The main difference between Blogger and WordPress lies in ownership, flexibility, and ease of use:
Ownership & Control:
- Blogger is owned by Google, meaning Google can suspend or delete your blog at any time.
- WordPress (especially WordPress.org) is self-hosted, giving you full control over your content.
Customization & Flexibility:
- Blogger offers limited themes and customization options.
- WordPress has thousands of themes, plugins, and customization features, making it more flexible.
Ease of Use:
- Blogger is beginner-friendly and requires no technical skills.
- WordPress has a learning curve but offers more powerful features.
Monetization:
- Blogger has built-in AdSense integration, but limited monetization options.
- WordPress allows various monetization methods, including ads, memberships, and e-commerce.
SEO & Performance:
- Blogger has decent SEO but limited control over optimization.
- WordPress provides advanced SEO tools and plugins for better search rankings.
Security & Support:
- Blogger is secure since Google handles security.
- WordPress requires manual updates and security measures but has a vast support community.
Choose Blogger if you’re looking for a free, straightforward platform for basic blogging.
Go with WordPress if you need complete control, scalability, and advanced features for a professional website.
Conclusion
In this article, you’ve learned what Blogger is, how to become a successful blogger, and the qualities needed to excel in blogging. Now, you’re ready to create your own blog on Blogger. To get started, you’ll need a domain name, a URL, and the ability to apply themes, customize layouts, add essential pages, and link your Blogger account to Google AdSense.
Since Blogger is a Google product, your website has a higher chance of growing and succeeding. Moreover, Google takes full responsibility for Blogger accounts linked to AdSense, ensuring that ads are displayed on your posts, enabling you to earn money.
Blogging offers the freedom to work without a boss or the constraints of a traditional 9-to-5 job. You can set your own schedule and work at your own pace. I hope this article has given you a clear understanding of what Google Blogger is and how to make the most of it.
What is Google Blogger?
Google Blogger is a free, user-friendly blogging platform created by Google. It allows individuals and businesses to create and manage blogs or websites without needing advanced technical skills. With Blogger, you can:
Publish blog posts.
Customize your blog’s design using themes and layouts.
Add essential pages like About, Contact, and Privacy Policy.
Monetize your blog by linking it to Google AdSense.
Blogger is ideal for beginners and offers features like free hosting, a custom domain option, and seamless integration with other Google tools like Google Analytics and Google Search Console. It’s a great platform for sharing ideas, building an audience, and even earning money online.
How can one earn money from blogs?
If you’ve understood what Google Blogger is, you can easily start earning money through your blog. For new bloggers, creating a website focused on product reviews is a great idea. Many companies today rely on product reviews to boost their sales, and if your website specializes in this niche, you can monetize it through:
Affiliate marketing (earning commissions by promoting products).
Selling advertisements or sponsored posts.
Promoting and selling products directly.
While Blogger is a great starting point, platforms like WordPress offer even more flexibility and advanced features for building a professional review-based website. With the right strategy, you can turn your blog into a profitable venture.
What equipment is needed for blogging?
To start blogging, the first thing you need is passion. If you’re passionate about your topic, blogging will be enjoyable, and you’ll be able to better understand and cater to the interests of your visitors. To get started, all you need is a laptop or mobile device and a reliable internet connection. With these tools and your enthusiasm, you’re ready to begin your blogging journey!